How to use an old Wireless Router as an Access Point – NetComm NP805N Gigabit Wireless Router

How to use an old Wireless Router as an Access Point – NetComm NP805N Gigabit Wireless Router

After some research and try , below are the steps that worked for me .
Not all steps are required but are applied for different reasons for example security .

Steps I have followed

  1. Reset Wireless Router ( kind of optional )
  2. Connected Wireless Router to a computer
  3. Logged in to Admin Web Interface of the Wireless Router  #  
  4. Updated Firmware ( kind of optional )
  5. Changed Admin Web Interface Password ( kind of optional )
  6. Modified Wifi Settings
  7. Modified Other Settings ( kind of optional )
  8. Modified LAN IP Address
  9. Disabled NAT and DHCP
  10. Connected the Wireless Router to your Main Modem/Router

1. Reset Wireless Router ( kind of optional )

I preferred to reset the wireless router so I did .
If you don’t know how to do this , check the user manual of the router .

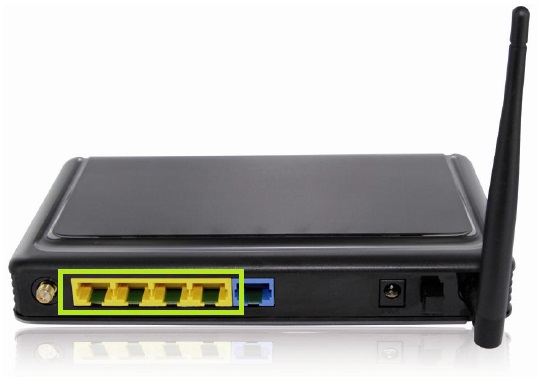
02. Connected Wireless Router to a computer

The computer device ( in my case laptop ) I used to follow the next steps , I have first :

  • Made sure network cable is not connected to the computer/laptop
  • Made sure Wifi is turned OFF on the computer/laptop
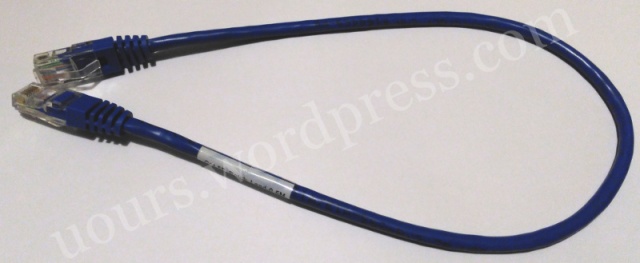
  • Connected the Wireless Router directly to the computer/laptop with an ethernet cable
  • Connected its power adapter to the Wireless Router
  • Switched ON the Wireless Router

I have connected the ethernet cable to one of the yellow sockets and not the blue socket . This is the way it is required for this scenario .


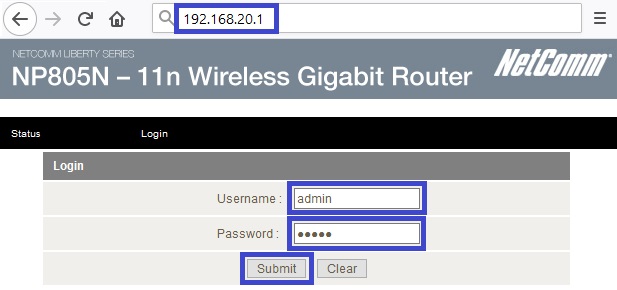
03. Logged in to Admin Web Interface area of the Wireless Router

The default access info of the Admin Web Interface would be printed on the Wireless Router . It is on the bottom side of this model .

The default IP address is : 192.168.20.1
The default Username is : admin
The default password is : admin

I prefer Firefox as browser for this purpose .
So I have opened the Admin Web Interface in Firefox and signed in using default username and default password .

04. Updated Firmware ( kind of optional )

I preferred to update the firmware so I did.
If you don’t know how to do this , check the user manual of the router .
If you are unsure , you might as well skip this step .

Menu Path : Toolbox > Firmware Upgrade

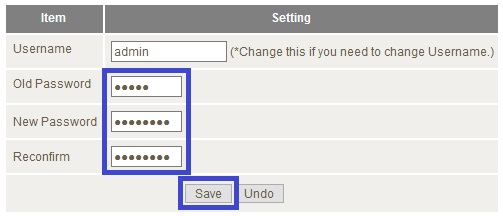
05. Changed Admin Web Interface Password ( kind of optional )

Menu Path : Network Setup > Change Password

Important : Noted down the New Password .

06. Modified Wifi Settings

Menu Path : Network Setup > Wireless

07. Modified Other Settings ( kind of optional )

Menu Path : Forwarding Rules > Miscellaneous > UPnp setting

Menu Path : Advanced Settings > System Time > Time Zone

Menu Path : Advanced Settings > IPv6

Menu Path : NAS Settings > File Sharing > FTP Service Configuration

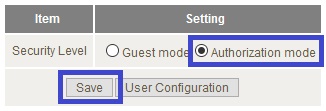
Menu Path : NAS Settings > Access Control > Security Level

Menu Path : Toolbox > Miscellaneous

08. Modified LAN IP Address

Menu Path : Network Setup > Network Setup

Considering I would have to access Admin Web Interface later , I changed the LAN IP address from 192.168.20.1 to 192.168.20.50 .

After the above change , I had to access the Admin Web Interface using IP Address 192.168.20.50 instead of 192.168.20.1 .

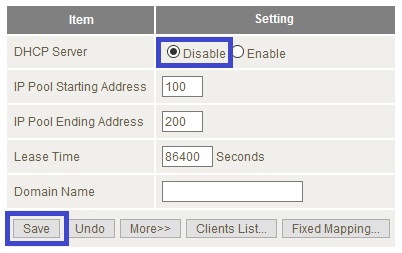
09. Disabled NAT and DHCP

Menu Path : Network Setup > Network Setup
Being setup as Access Point , NAT is not needed so selected “Disable” for NAT .

Menu Path : Network Setup > DHCP Server
Being setup as Access Point , DHCP Server is not needed so selected “Disable” for DHCP Server .

10. Connected the Wireless Router to Main Modem/Router

  • Disconnected Wireless Router from the computer/laptop
  • Turned it Off
  • Connected it to your Main Router using ethernet cable
  • Turned the Wirless Router On

Now the Wireless Router NP805N is serving as an Access Point .


  • Published by : Athyala Mani Kanth
  • Last Updated : 2020-04-14

Disclaimer :
This information is provided on an “as is” basis, with no warranties or representations, and any use of it is at the user’s own risk.

Trademark Legal Notice :
All product names, trademarks and registered trademarks are property of their respective owners. All company, product and service names used in this blog are for identification purposes only. Use of these names,trademarks and brands does not imply endorsement .


Ethernet RJ45 Combiner / Splitter

Ethernet RJ45 Combiner / Splitter

Consider an example where

  • in a room ( say room-1 ) you have a modem with two available ports
  • in another room ( say room-2 ) you have two devices needing wired connectivity simultaneously to the modem in room-1
  • but you have only one cable running from room-1 to room-2
  • for some reason you could not install another cable from room-1 to room-2

then you could use use a pair of ethernet combiner/splitter ‘s to solve the problem .

You could buy a pair of combiner/splitter or you could make yourselves if you have required tools and time on hand .

I have used a patch cable that was lying around . This cable was wired with T568A wiring standard by its manufacturer :

2017_04_25__ethernet_patch_cable

I have cut the cable in to two pieces :

2017_04_25__ethernet_patch_cable_cut_into_two_pieces

Wire / pinout order for T568A standard :

2017_04_25__t568a_standard_wire_pinout_order

I have cut off the unnecessary wires . The wires that I have kept can be seen in this image :

2017_04_25__wires_kept_by_cutting_off_unnecessary_wires

These are the two set of wires that I have inserted in a RJ45 modular plug and then crimped :

2017_04_25__the_two_cables_after_unnecessary_wires_are_cut_off

Wire color order and pinout numbering of the combiner / splitter :

2017_04_25__ethernet_combiner_splitter__pin_numbering

The final ethernet combiner / splitter is as shown below . I have made two of these :

2017_04_26__ethernet_combiner_splitter

This is the connectivity diagram :

2017-04-25__ethernet_combiner_splitter_connectivity_image


  • Published by : Athyala Mani Kanth
  • Last Updated : 2017-04-26

Centos – Email Logwatch output – Python Script and Crontab


import os, smtplib, socket
from email.MIMEMultipart import MIMEMultipart
from email.MIMEText import MIMEText

msg = MIMEMultipart()

msg[‘From’] = ‘FROM-EMAIL-ADDRESS’

msg[‘To’] = ‘TO-EMAIL-ADDRESS’

msg[‘Subject’] = ‘Logwatch – Linux Box’

# message = ‘Test Email Message’

# This worked for Logwatch 7.4.0 :
message = os.popen(“/usr/sbin/logwatch –range today –output stdout”).read()

# This worked for Logwatch 7.3 :
# message = os.popen(“/usr/sbin/logwatch –range today –print”).read()

ip_address = socket.gethostbyname(socket.gethostname())

if ip_address == “127.0.0.1”:
s = socket.socket( socket.AF_INET ,socket.SOCK_DGRAM )
s.connect( ( ‘8.8.8.8’ ,0 ) ) # connecting to a UDP address doesn’t send packets
ip_address = s.getsockname()[ 0 ]

message = ip_address.replace( ‘.’ ,’ ‘ ) + ‘\n\n’ + message

msg.attach(MIMEText(message))

mailserver = smtplib.SMTP(‘SMTP-SERVER’,587)

mailserver.ehlo()

mailserver.starttls()

mailserver.ehlo()

mailserver.login(‘USERNAME’, ‘PASSWORD’)

mailserver.sendmail(‘FROM_EMAIL_ADDRESS’,’TO_EMAIL_ADDRESS’,msg.as_string())

mailserver.quit()

# http://stackoverflow.com/questions/64505/sending-mail-from-python-using-smtp
# http://stackoverflow.com/questions/19243020/in-python-get-the-output-of-system-command-as-a-string
# http://stackoverflow.com/questions/166506/finding-local-ip-addresses-using-pythons-stdlib/25850698

Crontab Entry

1 11 * * * /usr/bin/python /directory_location_of_this_script/Logwatch_Send_By_Email.py


  • Published by : Athyala Mani Kanth
  • Last Updated : 2016-07-07


Centos – Logwatch – Save to file – Daily

BASH Script
Name: Logwatch__Save_To_File__Daily
Code: As Below . . .

#!/bin/bash

# Developer By : Mani Kanth Athyala
# Developed On : 2015-09-18
# Modified On : 2015-09-18

# Make sure logwatch.pl exits and is executable

false \
|| test -x /usr/share/logwatch/scripts/logwatch.pl \
|| exit 0

# Make sure logwatch exits and is executable

false \
|| test -x /usr/sbin/logwatch \
|| exit 0

# Make sure 'Daily Reports' exits and is a directory

false \
|| test -d '/Some-Directory/Logwatch Reporting/Daily Reports' \
|| exit 0

# Make sure the report is not generated already

false \
|| ! test -f '/Some-Directory/Logwatch Reporting/Daily Reports/Logwatch Report - Generated On '$(date +%Y-%m-%d)'.txt' \
|| exit 0

# Run logwatch

/usr/sbin/logwatch \
--output file \
--filename '"/Some-Directory/Logwatch Reporting/Daily Reports/Logwatch Report - Generated On '$(date +%Y-%m-%d)'.txt"'

# Change File Permissions

true \
&& test -f '/Some-Directory/Logwatch Reporting/Daily Reports/Logwatch Report - Generated On '$(date +%Y-%m-%d)'.txt' \
&& chmod 600 '/Some-Directory/Logwatch Reporting/Daily Reports/Logwatch Report - Generated On '$(date +%Y-%m-%d)'.txt'


  • Published by : Athyala Mani Kanth
  • Last Updated : 2016-07-07

AWS EC2 – LAMP Setup – RHEL 7

After launching an AWS EC2 instance , with RHEL 7 , LAMP can be setup as outlined below :

Update Linux

To update Linux run this command :

sudo yum update

If nothing gets updated , no need to reboot . Otherwise reboot the server by issuing this command :

sudo reboot

Install Apache Web Server

Command to install Apache Web Server :

sudo yum install httpd

Command to start Apache Web Server at System Boot/Reboot :

sudo systemctl enable httpd.service

Command to start Apache Web Server now :

sudo systemctl start httpd.service

Command to check if Apache Web Server has started and is active :

systemctl is-active httpd.service


sudo apachectl configtest

Install PHP Scripting Language

Before installing PHP make sure RHEL’s Extras and Optional repos are enabled . This is to make sure php-mbstring gets installed .
View the list of available repos using these commands :

sudo yum -y install yum-utils
sudo yum repolist all

Command to enable Extras and Optional repos :

sudo yum-config-manager --enable rhui-REGION-rhel-server-extras rhui-REGION-rhel-server-optional

View and make sure those repos are enabled :

sudo yum repolist all

Now install PHP using this command :

sudo yum install php php-mysql php-gd php-pear php-mbstring

Restart Apache Web Server

sudo systemctl restart httpd.service

Install MariaDB MySQL Database Server


sudo yum install mariadb-server mariadb
sudo systemctl start mariadb
sudo mysql_secure_installation
sudo systemctl enable mariadb.service

AWS => Amazon Web Services
EC2 => Elastic Compute Cloud
RHEL => Red Hat Enterprise Linux
LAMP => Linux Apache MySQL PHP


  • Published by : Athyala Mani Kanth
  • Last Updated : 2016-01-14


Centos – Daily – Status Log

I was interested in saving output of some useful Linux commands on a daily basis on the CentOS servers I manage . The below is the sort of bash script I have coded .

Add or remove commands as needed .

BASH Script
Name: Centos – Daily – Status Log
Code: As Below . . .

#!/bin/bash

filename='Command Output - Last - Generated On '$(date +%Y-%m-%d).txt

cd '/Path/To/Logs/Directory'

Dashed_Line="------------ ------------ ------------ ------------ ------------ ------------ ------------"

echo '' > "${filename}"

echo $Dashed_Line >> "${filename}"
echo '' >> "${filename}"
echo 'Command output of "pwd" on '$(date +%Y-%m-%d)' ' >> "${filename}"
echo '' >> "${filename}"
echo $Dashed_Line >> "${filename}"
echo '' >> "${filename}"

pwd >> "${filename}"

echo '' >> "${filename}"
echo $Dashed_Line >> "${filename}"
echo '' >> "${filename}"
echo 'Command output of "df -h" on '$(date +%Y-%m-%d)' ' >> "${filename}"
echo '' >> "${filename}"
echo $Dashed_Line >> "${filename}"
echo '' >> "${filename}"

df -h >> "${filename}"

echo '' >> "${filename}"
echo $Dashed_Line >> "${filename}"
echo '' >> "${filename}"
echo 'Command output of "last" on '$(date +%Y-%m-%d)' ' >> "${filename}"
echo '' >> "${filename}"
echo $Dashed_Line >> "${filename}"
echo '' >> "${filename}"

last >> "${filename}"

echo '' >> "${filename}"
echo $Dashed_Line >> "${filename}"
echo '' >> "${filename}"
echo 'Command output of "history" on '$(date +%Y-%m-%d)' ' >> "${filename}"
echo '' >> "${filename}"
echo $Dashed_Line >> "${filename}"
echo '' >> "${filename}"

set -o history
history -r ~/.bash_history
history >> "${filename}"

echo '' >> "${filename}"
echo $Dashed_Line >> "${filename}"
echo '' >> "${filename}"
echo 'Command output of "lastlog" on '$(date +%Y-%m-%d)' ' >> "${filename}"
echo '' >> "${filename}"
echo $Dashed_Line >> "${filename}"
echo '' >> "${filename}"

lastlog >> "${filename}"

echo '' >> "${filename}"
echo $Dashed_Line >> "${filename}"
echo '' >> "${filename}"
echo 'Command output of "df" on '$(date +%Y-%m-%d)' ' >> "${filename}"
echo '' >> "${filename}"
echo $Dashed_Line >> "${filename}"
echo '' >> "${filename}"

df >> "${filename}"

#
# echo '' >> "${filename}"
# echo $Dashed_Line >> "${filename}"
# echo '' >> "${filename}"
# echo 'Command output of "fail2ban-client status" on '$(date +%Y-%m-%d)' ' >> "${filename}"
# echo '' >> "${filename}"
# echo $Dashed_Line >> "${filename}"
# echo '' >> "${filename}"
#
# fail2ban-client status >> "${filename}"
#

set -o history
history -r ~/.bash_history
history >> "${filename}"

Crontab Entry

0 * * * * "/Path/To/Bash Script/Centos - Daily - Status Log"


  • Published by : Athyala Mani Kanth
  • Last Updated : 2016-01-18

Setup GIT Server on Centos and SourceTree Client on Win7

Install GIT on Centos

I used this command to install git:

# yum install git

Running the above command has:
Setup install process
Resolved dependencies
Installed required packages as necessary
Upgraded required packages as necessary

Added a new group:

# groupadd devs

Added a new user to the group

# useradd -G devs -d /home/gituser -m -s /bin/bash gituser
# passwd gituser
Changing password for user gituser.
New UNIX password: ********
Retype new UNIX password: ********
passwd: all authentication tokens updated successfully.

I have set necessary permissions to new user home directory: /home/gituser/
Set Permissions: devs gituser 0700

I have created Sub Directory: .ssh in /home/gituser/
Set Permissions: devs gituser 0700

I have created File: authorized_keys in /home/gituser/.ssh
Set Permissions: devs gituser 0644

In /etc/ssh/sshd_config added group devs to AllowGroups list
AllowGroups root devs

Generated SSH-2 RSA key
Copied public key to file /home/gituser/.ssh/authorized_keys

SourceTree – Free Git & Mercurial client for Windows or Mac
SourceTree can be downloaded from:
http://www.sourcetreeapp.com/
Installed SourceTree

Configured SourceTree to access git server

Logwatch on Centos

Logwatch on Centos

Go to a directory to download the source of logwatch

# cd /usr/local/src

Download the source for logwatch

# wget http://sourceforge.net/projects/logwatch/files/logwatch-7.4.0/logwatch-7.4.0.tar.gz/download

Extract the files from the logwatch-7.4.0.tar.gz

# tar xvfz logwatch-7.4.0.tar.gz

Give the execute permission to install_logwatch.sh

# cd logwatch-7.4.0
# chmod a+x install_logwatch.sh

Run the script and enter the correct paths for logwatch

# ./install_logwatch.sh

For default options , the output could be :

#################################
Preparing to install Logwatch
Enter the path to the Logwatch BaseDir [/usr/share/logwatch] :
### Using /usr/share/logwatch
Enter the path for the Logwatch ConfigDir [/etc/logwatch] :
### Using /etc/logwatch
Enter the dir name to be used for temp files [/var/cache/logwatch] :
### Using /var/cache/logwatch
Enter the location of perl [/usr/bin/perl] :
### Using /usr/bin/perl
Enter the dir name to used for the manpage [/usr/share/man] :
### Using /usr/share/man
### Installing
Created symlink for /usr/sbin/logwatch
Created /etc/cron.daily/0logwatch

After installation/upgrade I have run the logwatch which has run with some issues :

Issue :

A big list of file names appeared which seemed like junk :

You have old files in your logwatch tmpdir (/var/cache/logwatch):
logwatch.xxxxxx
logwatch.xxxxxx
logwatch.xxxxxx
... more ...
... and more ...
The directories listed above were most likely created by a logwatch run that failed to complete successfully. If so, you may delete these directories.

Solution that worked for me ( based on a comment from someone else’s page ) :

I have deleted those files and the above sort of output disappeared .


  • Published by : Athyala Mani Kanth
  • Last Updated : 2013-09-02

Simple MySQL Stored Procedure ( Without Parameters )

Simple MySQL Stored Procedure Without Parameters and Considering One MySQL Table

For the purpose of this tutorial , I have considered a MySQL table student_scores with very simple structure and some sample data .

— student_scores Table Structure

CREATE TABLE IF NOT EXISTS `student_scores` (
`id` int(11) NOT NULL AUTO_INCREMENT,
`score_1` int(11) NOT NULL DEFAULT ‘-1’,
`score_2` int(11) NOT NULL DEFAULT ‘-1’,
`total_score` int(11) NOT NULL DEFAULT ‘-1’,
PRIMARY KEY (`id`)
) ENGINE=MyISAM  DEFAULT CHARSET=utf8 ;

— Data

INSERT INTO `student_scores` (`score_1`, `score_2`) VALUES
(75, 80),
(80, 85),
(90, 80);

— PROCEDURE

I am considering a procedure update_total_scores to calculate the Total Score for each row and to update the corresponding total_score column .

— PROCEDURE DEFINITION

CREATE DEFINER = `test_user`@`localhost`
PROCEDURE `update_total_scores` ( )
COMMENT 'This procedure calculates Total Score and Updates for each row.'
NOT DETERMINISTIC
CONTAINS SQL
SQL SECURITY INVOKER
BEGIN
UPDATE `student_scores` SET `total_score` = `score_1` + `score_2` ;
END

— ADDING USING PHPMYADMIN

  • Step 1 : When in PHPMyAdmin , Click Routines .
    You probably would see something like this :

Add Mysql Procedure Using PHPMyAdmin

  • Step 2 : Click Add Routine .
    An empty form will be displayed to add in a routine.
  • Step 3 : Select and/or Type In all the necessary fields appropriately .
    It could probably look something like this :

Image : Add MySQL Procedure Using PHPMyAdmin

  • Step 4 : Click Go .
    After the routine is successfully created , you probably would see something like this :

add_mysql_routine_using_phpmyadmin_img3

  • Step 5 : Execute it , Or Call it by its name update_total_scores in your MySQL Query in your Scripts .

— PROCEDURE DEFINITION

DELIMITER $$
CREATE DEFINER = `test_user`@`localhost`
PROCEDURE `update_total_scores` ( )
COMMENT 'This procedure calculates Total Score and Updates for each row.'
NOT DETERMINISTIC
CONTAINS SQL
SQL SECURITY INVOKER
BEGIN
UPDATE `student_scores` SET `total_score` = `score_1` + `score_2` ;
END $$
DELIMITER ;

— EXPLANATION

DELIMITER $$ : Change the delimiter to $$ ( from the usual ; )
NOT DETERMINISTIC : I have considered the default
CONTAINS SQL : I have considered the default
SQL SECURITY INVOKER : This is to instruct that when executing , this procedure should execute with the privileges of the invoking user/account
DELIMITER ; : Put back the delimiter to ;

Published by : Athyala Mani Kanth
Last Updated : 2013-09-02

Website Migration from Old server to New server ( Generic steps )

Website Migration from Old server to New server ( Generic steps )

  1. Put Maintenance Notification on the Old Server .
  2. Copy all the various code files from Old Server to New Server : PHP , CSS , JavaScript , etc .
  3. Copy all the various directories of images ( or file attachments ) from Old Server to New Server . Set directory permissions as necessary .
  4. Create MySQL User(s) on the New Server .
  5. Create MySQL Database on the New Server .
  6. Give Privileges on the newly created Database to the newly created User .
  7. Export Database from MySQL on Old Server .
  8. Import Database into MySQL on New Server .
  9. Set up the Linux cron jobs on the New Server .
  10. Test Wesbite on the New Server .
  11. Modify DNS from your Domain Name Server Management .
  12. Put Redirection on the Old Server to the New Server .

Published by : Athyala Mani Kanth
Last Updated : 2013-06-13